Nokia 3 TA-1032 vibrate only fix: If you are facing vibrate only problem with you Nokia 3 TA-1032, then you are at right place. In this post i will explain how to solve Nokia 3 TA-1032 vibrate only fault. so don’t go away read this post and know how we solved vibrate only fault in Nokia 3.
Note: Do all at your own risk, backup your important data from phone before starting if you can. we are not responsible for any reason. If you have something important inside your phone you should contact an expert regarding internal data.
Symptoms:
We received Nokia 3 full dead and customer told that phone gone dead due to low battery, so we disassembled Nokia 3 and charged battery manually using regulated power supply. But unfortunately phone was unable to power on. Nokia 3 give vibrate only at power on or connecting with charger.
Nokia 3 vibrate only fault investigation:
After charging Nokia 3 dead battery the phone condition was vibrate only so we decided to check phone detection with Computer, because sometimes phone give only vibrate due to damaged display or display light driver components. at this point we confirmed that Nokia 3 won’t turn on after vibrate.
Possible fault:
- Software damaged
- Hardware damaged
Nokia 3 Software Fault Possibility if only vibrate
If your phone is at only vibrate and won’t turn on after vibrate, then it may be due to software crashed, damaged. In this case customer told us that he already visited an other technician. so may be someone already tried to install software on this device. so we decided to install latest official firmware for Nokia 3 TA-1032.
Reasons of vibrate only fault in Nokia or other phones:
As per my own 12 years experience in mobile phone repairing business, i have seen vibrate only fault in Nokia and other phones due to listed reasons. you should keep them in mind if you are a mobile phone technician.
1- Flashing downgrade version of firmware can cause dead / vibrate only.
- Install latest firmware possible
- ↓Unbrick via USB / JTAG / Direct eMMC programming
2- Flashing wrong firmware can cause dead / vibrate only.
- Find and install correct firmware
3- Damaged software / applications can cause dead / vibrate only.
- Install latest firmware
4- Low battery voltage can cause dead / vibrate only.
- Charge / Change Battery
5- Damaged LCD / Display can cause vibrate only.
- Check with new LCD
6- Damaged or non working eMMC (Internal memory) can cause dead / vibrate only.
- It’s a critical work but can be done by buy different ways.
- You can unbrick your phone by swapping working eMMC from same board
- If your smartphone have Samsung eMMC inside you reprogram it.
- You can unbrick your phone by changing eMMC with new.
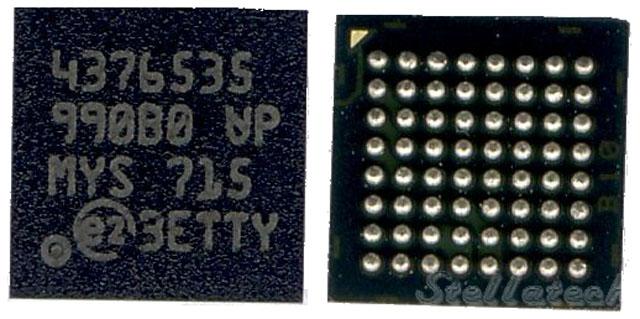
7- Damaged / Cracked circuit board can cause dead / vibrate only.
- Check phone PCB deeply
8- Faulty CPU can cause dead / vibrate only.
- Replace faulty CPU / Arrange new board
How we fixed Nokia 3 vibrate only fault
As you know that we are running a professional mobile phone repair lab, so we mostly using professional mobile phone service tools to save time. so in this case we used Infinity BEST to flash firmware on Nokia 3. You may also like Infinity BEST Learning Course you can enroll in this course free of cost. Infinity BEST2 have ability flash Nokia latest phone bassed on MTK or Qualcomm. Nokia 3 firmware can be found below. don’t worry if you have not Infinity BEST dongle Flash tool can be found also in this post. but sorry we have not screenshot guide for it this time.
- Nokia 3 Latest firmware: NE1-215H-0-00WW-B02.7z
- Nokia 3 Flash tool: NOKIA 3 FLASH TOOL [PASSWORD = pakfones.com]
How to flash Nokia 3
- Install OST_TOOL and drivers from OST_TOOL folder.
- Open OnlineUpdateTool with 7zip
- Replace . exe file OnlineUpdateTool with an exe file OnlineUpdateTool exracted from the patch
- Delete OnlineUpdateTool.exe.config in a folder C:\Program Files (x86)\OST LA
- Open OnlineUpdateTool from C:\Program Files (x86)\OST LA and browse the .nbo file
- Enter your Nokia 3 into Download mode connected with USB cable to your PC
- After your device enter into Download mode, the button Edit Phone Information will be available.
- Press that button and wait for a error (something like failed to reboot to FTM mode) being
appeared. - Don’t worry about it. Press OK and Next button should be activated.
- Press Next button device will reboot into FTM and flashing will be stared.
- It will take 8 – 10 minutes
- Done! Enjoy [ Credit: royalmech, for posting all information. ]
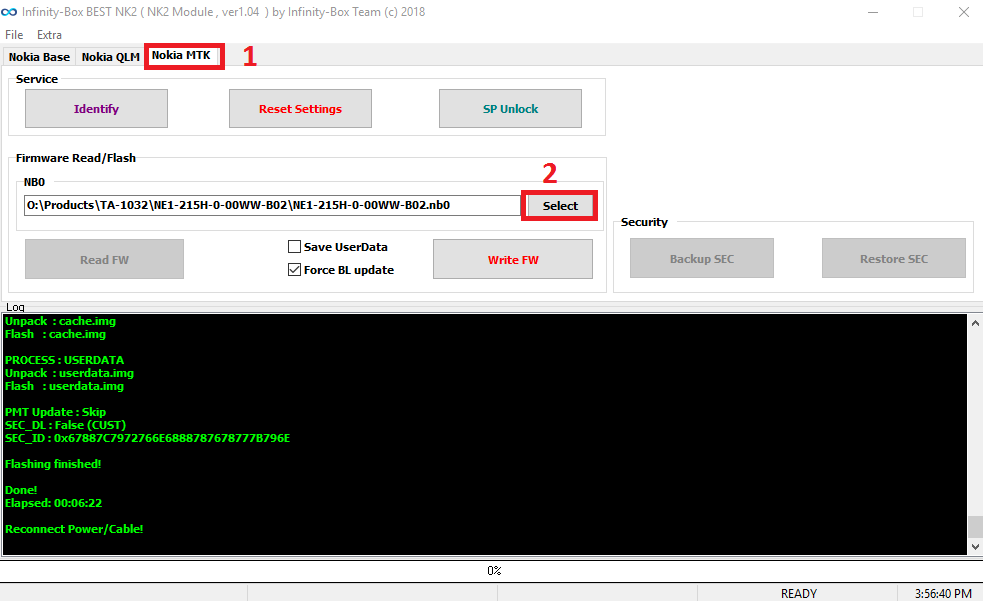
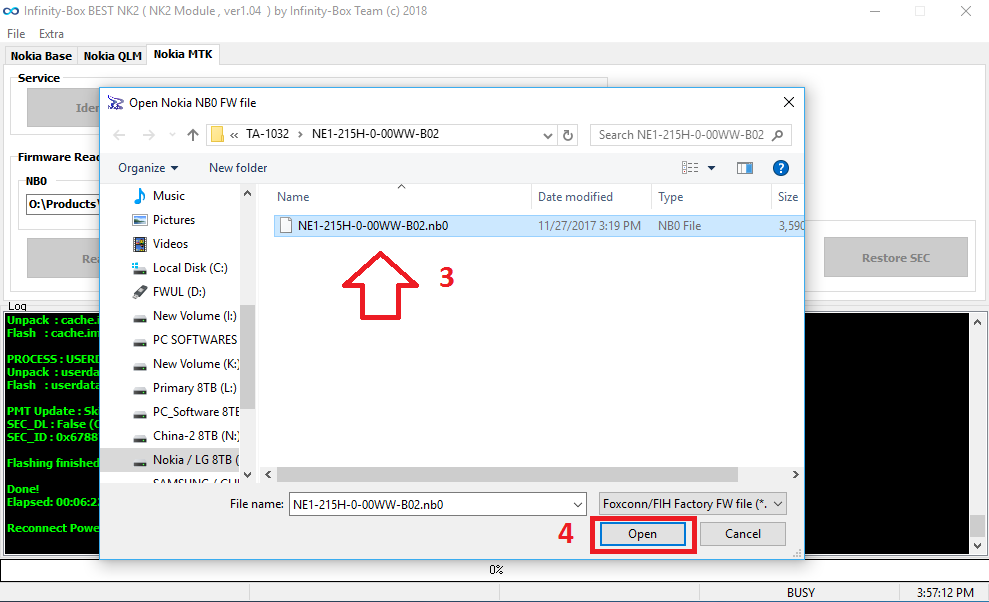
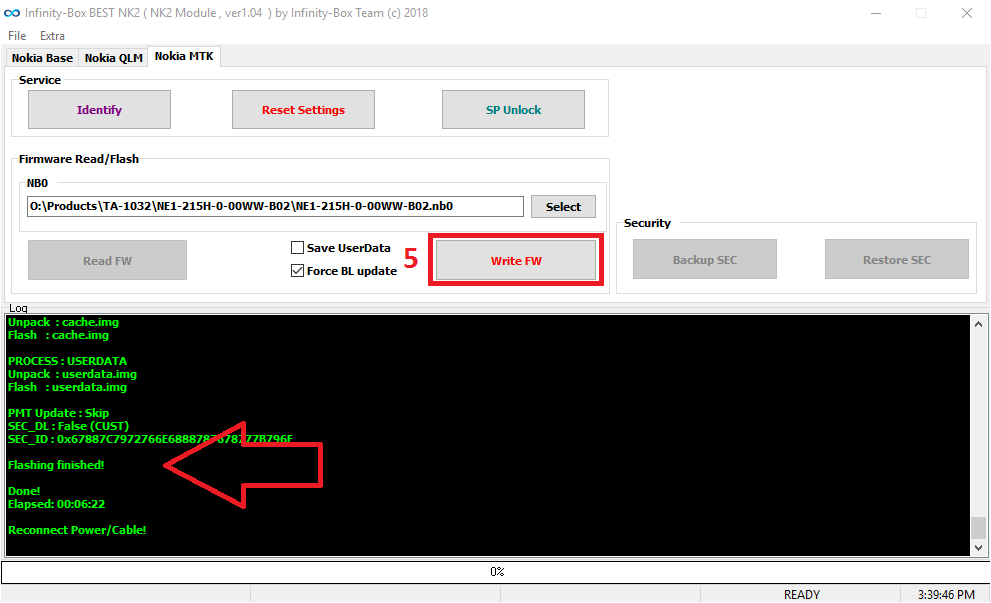
How to flash Nokia 3 using Infinity BEST:
To flash MTK based Nokia smartphones open Infinity BEST2.exe and follow the screen shots below.
 tested firmware and flashing guide-success-png")
Don’t forget to share your experience, follow us for more.
Nokia 3 flash log:
Card found : xxxxxxxxxx , v0122
Infinity-Box BEST Nokia [HMD] Module [NK2] v1.04

Load : O:\Products\TA-1032\NE1-215H-0-00WW-B02\NE1-215H-0-00WW-B02.nb0
Load Ok!

Operation : Write FW [ v1.04 ]

Setting : UserData preserve : False
Setting : Bootloader update : True

1. Make sure device is powered off. Power off, if need. Wait 20 seconds after
2. Insert USB cable in phone
Waiting for device connection ...

PTFN : MTK USB Port (COM18)
MODE : BOOTROM
PORT : 18
Error : Failed to open port!

Error : Fail to init protocol!
Remove battery, cable. Check cable and connection. Repeat operation!

Reconnect Power/Cable!

Operation : Write FW [ v1.04 ]

Setting : UserData preserve : False
Setting : Bootloader update : True

1. Make sure device is powered off. Power off, if need. Wait 20 seconds after
2. Insert USB cable in phone
Waiting for device connection ...

PTFN : PreLoader USB VCOM Port (COM49)
MODE : PRELOADER PORT
PORT : 49
Waiting BOOT ack ...
PRELOADER : ACK confirmed!
BROM : Init BROM
BROM init passed!
CHIP : MT6735 , SBID : 0x8A00 , HWVR : 0xCA00 , SWVR : 0x0000
TYPE : LEGACY MTK
BROM : DSLevel : DEV_KEY+DEV_CRT
BROM : PRELOADER PORT
AGENT : Look for suitable BootChain in DA ...
AGENT : DEFAULT AUTO
AGENT : Found MT6735
AGENT : Nokia_All_InOne_DA_v01.2018.0707
Fail to disable Dog!
BROM : Sending 1st DA ...
BROM : DA sent
BROM :Transfer control to DA ...
DA : AGENT started!
NAND : DEVICE NOT FOUND
eMMC : OK
eMMC : 450100444634303136019E5FCD8A6215
DAInf: 4 : 2 : 155
DA : DRAM ready!
DA : BOOT to 2nd DA ...
DA : Receiving HW info

EMMC: 450100444634303136019E5FCD8A5415
EMMC: VEN : SANDISK | OEM : 01 | DEV : DF4016
EMMC:
BOOT1 : 0x00400000 [ 4.00 MB ]
BOOT2 : 0x00400000 [ 4.00 MB ]
RPMB : 0x00400000 [ 4.00 MB ]
USER : 0x3AB400000 [ 14.68 GB ]

DRAM: 0x00020000 [ 128.00 KB ]
SRAM: 0x80000000 [ 2.00 GB ]

CHIP : MT6735 , SBID : 0x8A00 , HWVR : 0xCA00 , SWVR : 0x0000 , EVOL : 0x0000

RNID : F34D75AF65D227ABBE52A284126B06

STATUS : BLANK FLASH
BSTYLE : EMMC FLASH BOOT

Boot done!

SEC_DL : False (CUST)
SEC_ID : 0x67887C7972766E6888787678777B796E

[FL] : HW verification passed!

Erase : 0x0000000001C80000 : 0x0000000005680000
Erase : 0x0000000007320000 : 0x0000000002000000
Erase : 0x0000000009B20000 : 0x000000017D4E0000

PMT Update : Skip

Flashing now ...

PROCESS : PRELOADER
Unpack : NE1-0-215H-preloader_NE1.bin
Flash : NE1-0-215H-preloader_NE1.bin
Update bootloader code ...
Update bootloader Ok!

PROCESS : LK
Unpack : NE1-0-215H-lk.bin
Flash : NE1-0-215H-lk.bin

PROCESS : BOOT
Unpack : NE1-0-215H-00WW-boot.img
Flash : NE1-0-215H-00WW-boot.img

PROCESS : RECOVERY
Unpack : NE1-0-215H-00WW-recovery.img
Flash : NE1-0-215H-00WW-recovery.img

PROCESS : LOGO
Unpack : NE1-0-215H-logo.bin
Flash : NE1-0-215H-logo.bin

PROCESS : SECRO
Unpack : NE1-0-215H-secro.img
Flash : NE1-0-215H-secro.img

PROCESS : TEE1
Unpack : NE1-0-215H-trustzone.bin
Flash : NE1-0-215H-trustzone.bin

PROCESS : TEE2
Unpack : NE1-0-215H-trustzone.bin
Flash : NE1-0-215H-trustzone.bin

PROCESS : SYS_INFO
Unpack : fver
Flash : fver

PROCESS : SUTINFO
Unpack : NE1-00WW-001-sutinfo.img
Flash : NE1-00WW-001-sutinfo.img

PROCESS : CDA
Unpack : NE1-00WW-010-cda.img
Flash : NE1-00WW-010-cda.img

PROCESS : SYSTEM
Unpack : NE1-0-215H-00WW-system.img
Flash : NE1-0-215H-00WW-system.img

PROCESS : CACHE
Unpack : cache.img
Flash : cache.img

PROCESS : USERDATA
Unpack : userdata.img
Flash : userdata.img

PMT Update : Skip
SEC_DL : False (CUST)
SEC_ID : 0x67887C7972766E6888787678777B796E

Flashing finished!

Done!
Elapsed: 00:06:22

Reconnect Power/Cable!